Overview
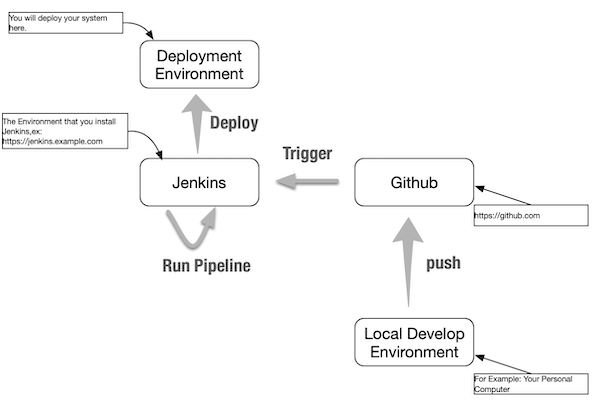
This series is divided into two parts to introduce how to integrate Github and Jenkins in practice.
The first part focuses on how to trigger the Jenkins pipeline to run when you push to the Github.
The second part focuses on how to write Jenkins pipeline to get the difference between two commits so that you can perform different operations , such as deleting files in the deployment environment for deleted files, and modified and added files are uploaded to the deployment environment via scp.
This article is the first part of a series on how to use Github’s Webhooks to automatically trigger Jenkins to execute a certain Pipeline you define when you push a project to Github.
This article assumes that you are familiar with Git and the basic operations on Github, including how to create a repository and how to push your local repository to Github; you should also have Jenkins installed and accessible via a public IP address or domain name.
Summary
Step 1: Find the callback URL address provided by Jenkins.
If you want Github to notify your Pipeline defined in Jenkins, you need a URL that you can later configure into Github. Assuming your Jenkins can be accessed via this URL: https://jenkins.example.com, basically the callback URL address is https://jenkins.example.com/github-webhook/. You can find this URL by these following steps.
- Log in to your Jenkins
- Go to Manage Jenkins
- click Configure System
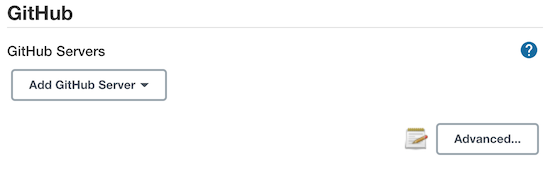
- scroll down, find the Github configuration, and click the Advanced… button
- select the Specify another hook URL for GitHub configuration
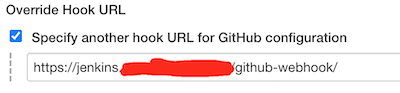
The one shown above is the URL callback address you need. Note that the purpose of checking that checkbox is only to find your URL address, so remember to uncheck that checkbox at the end and don’t need to save the configuration.
Step 2: Create an Organization on Github
Since Github does not support individual accounts to set up webhooks, you need to create an Organization. Please refer to: https://docs.github.com/en/organizations/collaborating-with-groups-in-organizations/creating-a-new-organization-from-scratch article to create an Organization.
Step 3: Create a Repository under your Github Organization.
It’s exactly the same as how to create a Repository under your personal account, but now you go inside the Organization to create it instead. I won’t go into detail about this step.
In general, it’s more flexible and convenient to use a Jenkinsfile to define a Pipeline. So, add a file named Jenkinsfile under your Repository root(I won’t go into the details of how to define a Pipeline in this article), and later, I’ll create a Multibranch Pipeline in Jenkins that will use this Jenkinsfile file.
An example of Jenkinsfile:
1 | pipeline { |
Step 4: Configuring Webhooks in your Repository
Click on settings in your Repository:
Click Webhooks: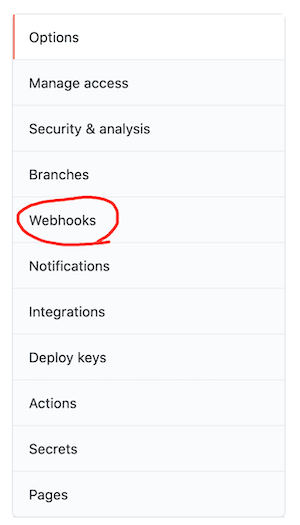
Click Add Webhook: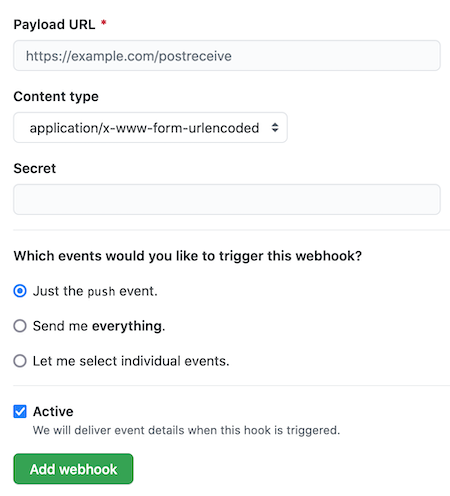
Fill the callback URL as the Payload URL, you can also choose the appropriate Events to Trigger the webhook.
Finally click the Add webhook button to save it.
Step 5: Create a Personal Access Token on Github
This is a preparation for being able to access Github later in Jenkins.
Click your account’s Settings(Not the repository’s Settings):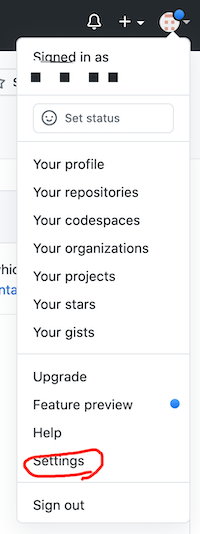
Find the Developer Setting menu on the left: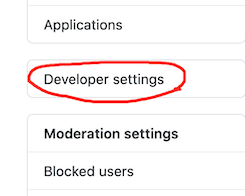
Once you are on the page, find Personal access tokens, create a Personal access tokens as required and copy and save it in time, we will use it later.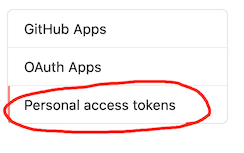
Step 6: Create a Credential in Jenkins
In order to enable Jenkins to access Github and download the Repository later, we need to configure a Credential first.
Go to: Manage Jenkins -> Manage Credential
Click on Jenkins (below)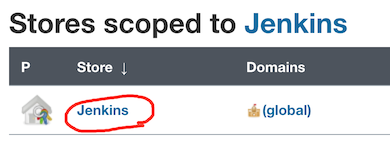
Click Global Credentials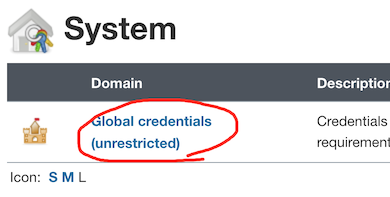
In the left menu click Add Credentials
Select Username with password Type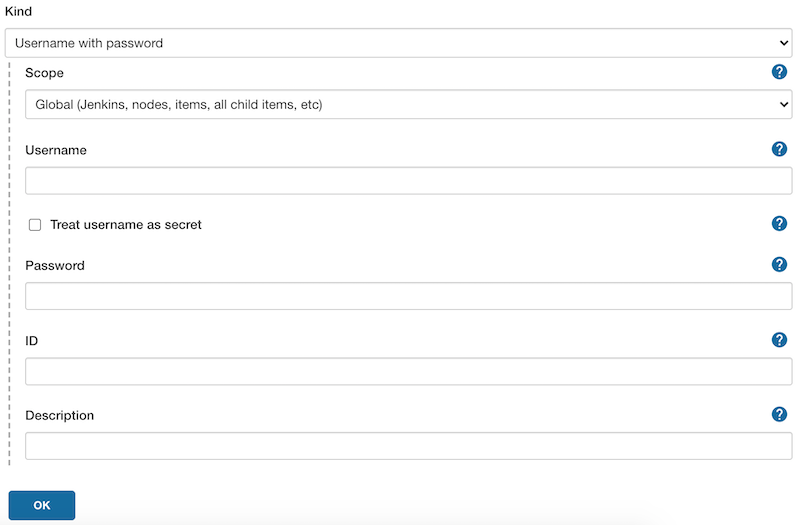
In the form above, fill in Username with the login email you used for your Github account, Password with the Personal access token you got in step 5, and ID with the name you want. Just click the OK button.
Step 7: Create a Multibranch Pipeline in Jenkins
Select New Item on the left menu, enter a name for the Item, and select the Multibranch Pipeline type. This is a recommended type to maintain Jenkinsfile files in your own repository, making it easy to use different Jenkinsfile files in different branches in order to reach the point where you only need to create one Pipeline to support CI/CD processes for multiple environments at the same time. For example: Dev/Test/Prod/Hotfix, etc.
Select Github in Branch Source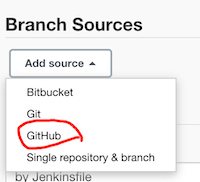
Select the Credential you just created and fill in the address of your project on Github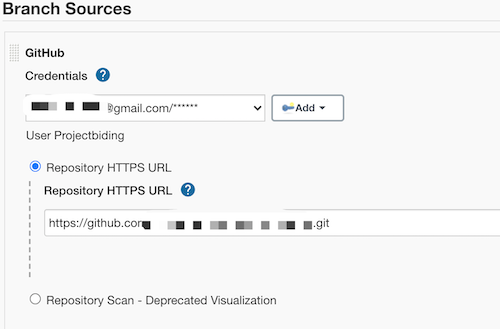
After filling out the form, you can save it.
Step 8: That’s all, Now you can test it
You can modify the Repository on your Github and then push it to Github, refresh Jenkins later and you will see the results of Jenkins execution.
Conclusion
- personal projects do not support the configuration of webhook, at least need to create an Organization.
- if you are familiar with Jenkins, you can also configure other types of Pipeline, such as Freestyle Project and so on.
- At present, Multibranch Pipeline needs to use https to access github by default, so you need to configure Personal access token on github.
- You can also configure SSH type Credential with public-private key pair to access Github.